


October 2023
 Loading...
Here we will show you how to buy an NFT to invest, we will do a step by step about the OpenSea marketplace since it is one of the marketplaces with the highest number of monthly visits, more than 60 million monthly visits from people who come to buy or sell their NFTs within this marketplace, pioneer and market leader.
At OpenSea NFTs are created under the Ethereum network and the Polygon network. Although being the middle of the year 2022 they are already experimenting with the Solana network that they will supposedly incorporate later for all operations. At this time the Solana network is in a trial period on this marketplace.
To be able to buy in OpenSea you need to have a wallet with an available balance in the ETH and/or MATIC cryptocurrencies, you can read the articles suggested in the next point if you do not know how to have a wallet and/or provide it with a balance in the mentioned cryptocurrencies.
We suggest the use of the Metamask wallet, the most complete and intuitive wallet par excellence on the market, although you can also choose any of the wallets compatible with OpenSea.
Before going fully step by step we need to clarify some issues.
We recommend reading the following articles before proceeding with this tutorial:
If you choose to buy on the Opensea marketplace or any of the marketplaces that we publish on this site, you must be sure that you are browsing the official website of the marketplace, since there are replica sites that emulate the original marketplace in order to obtain your account data or wallet and thus appropriate your funds.
There are also supposed unknown marketplaces that show NFTs with very attractive prices, this is where you have to be more careful because it can also be a scam similar to imitation sites.
Below we list the legitimate URLs of the most popular marketplaces:
Other forms of scam:
Once you make sure you are in an official marketplace, you must take other measures to prevent being a victim of fraud:
In this article we will focus on the purchase of an NFT linked to digital art, that is, an asset that we can keep in order to hope that its value will increase in the future, then sell it and obtain a profit from said operation.
Before choosing an NFT to buy, you should look at the authority and the community behind it. We have written an article in reference to this topic that we recommend reading: “Authority and Community make investment in NFTs attractive”.
But if these conditions are not met or are partially met and you are looking for an NFT at a good price and you believe that the creator artist has significant potential or whose project has other conditions that could increase its value in the future, such as being part of an interesting collection, could be a good option for you to buy it, since this type of finds later on may develop certain aspects of authority and community that could feed off each other and significantly increase their value, but it is already related to probabilities and the risks you want to take, so is important that its value is not significant and that you carry out the checks that you think are necessary.
We delve deeper into this topic in the article “Is it worth buying an NFT from a collection not verified by OpenSea?”
You need to connect your Metamask wallet and sync it with the OpenSea marketplace before you can start buying and/or selling NFTs. Here we show you how to do it.
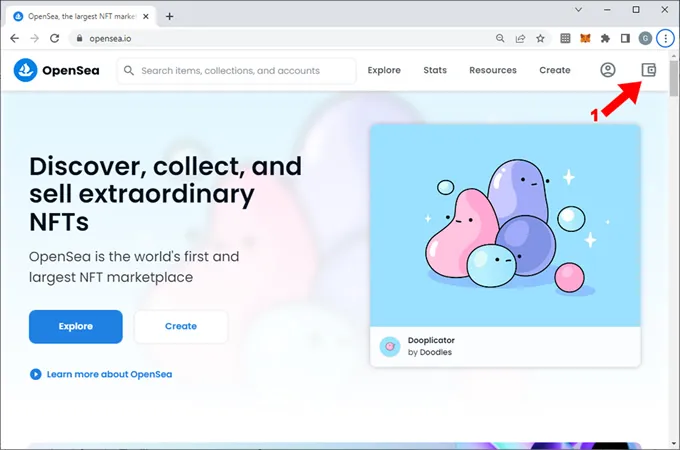
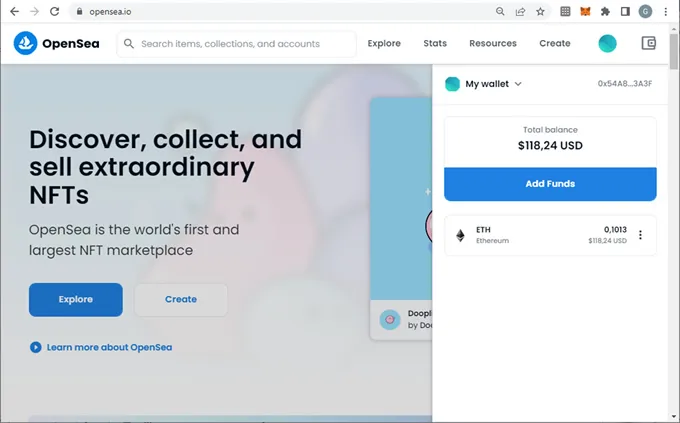
1. Load the OpenSea home page and click on the “Wallet” button (1) at the top right
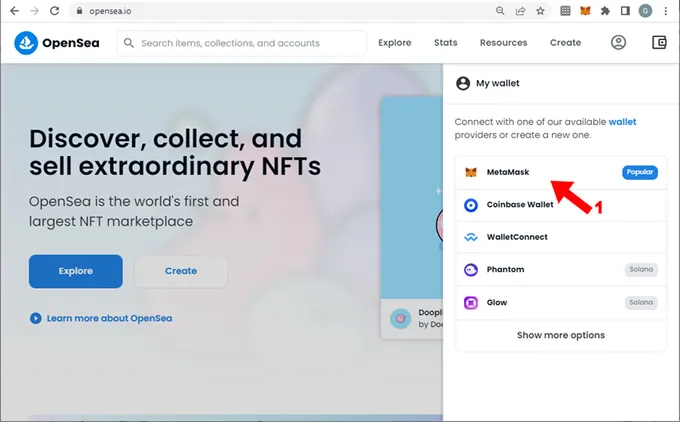
2. If it is the first time you enter, it will ask you to connect your wallet to the marketplace, then you must click on Metamask (1)
3. Request the password to unlock the wallet integrated into the browser. If you have not yet integrated Metamask into your browser, you need to read the article “The definitive guide to the Metamask wallet to store your NFTs and cryptocurrencies”
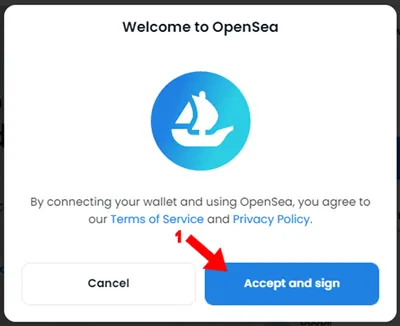
4. Before connecting the wallet to OpenSea, the system requests to accept the terms of service and sign the access from the wallet, once you agree, click on "Accept and sign" (1) (Accept and sign)
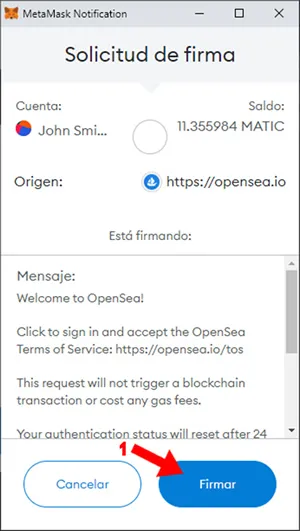
5. Already on the wallet, it launches a "Signature Request" that basically authorizes OpenSea to take the funds from the wallet in case of the purchase of an NFT and/or to pay the "Gas Fee" that arises from a purchase. Click on "Sign" (1)
6. OpenSea has connected with the wallet and everything is ready to buy your NFTs
This step is optional but if you want you can complete it to give your OpenSea account a custom look.
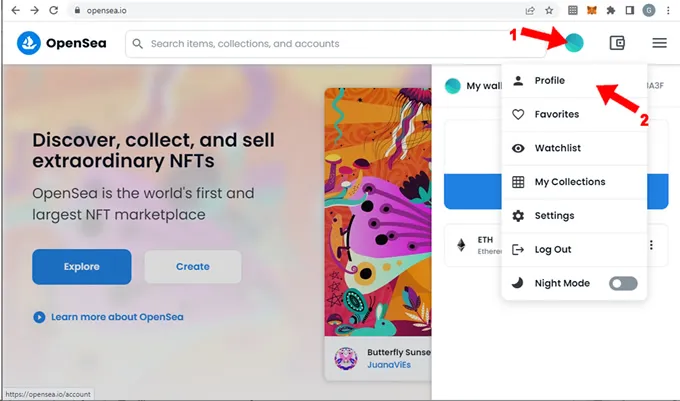
1. Rest the mouse on the colored circle that appears to the right of the search box (1), this will open a popup window and click on "Profile" (2)
2. The default profile is displayed, as we can see in the middle of the screen on the left, it shows the ID of your OpenSea account, it is the same ID of the Metamask wallet, unique and unrepeatable (4) . By resting the mouse in the center of the screen you can choose to click with the mouse on the pencil (1) that will allow you to upload a banner image as a presentation of your account. On the left, if you click on the colored circle (2), it allows you to upload another image, in this case the profile image to visually identify your account. And finally it shows the name of the OpenSea account, by default it is “Unnamed”, but you can modify it by pressing the 3 dots on the right of the page (3)
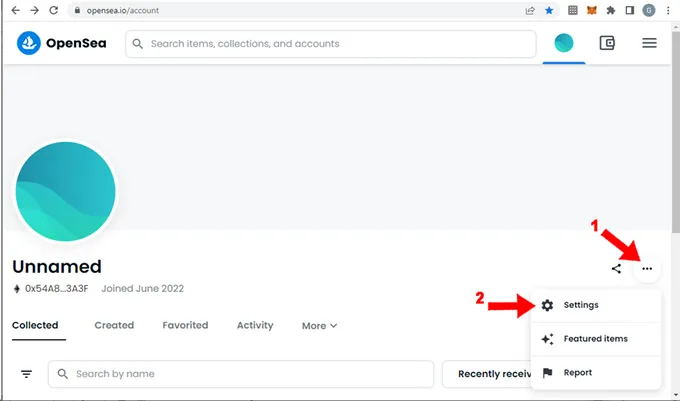
3. Pressing the 3 dots on the right of the page (1) opens a popup window, here press "Settings" (2)
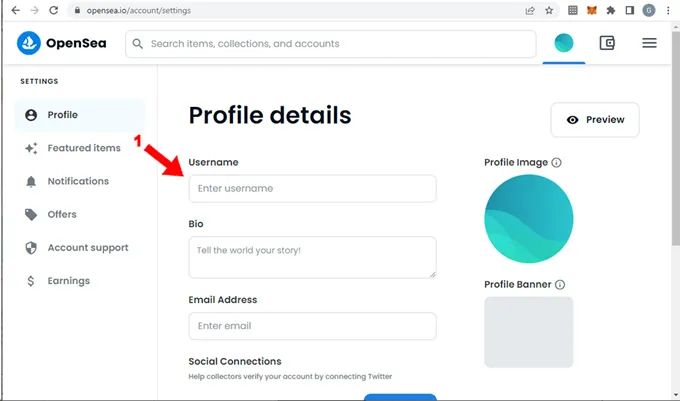
4. A lot of data is displayed to customize, including the profile image and the presentation banner that allowed to modify in the previous screen. In order to speed up this tutorial we will complete only the “Username” (1) . The username cannot coincide with the username of another OpenSea account, since it must be unique and unrepeatable. Also the Username cannot contain blank spaces, only letters, numbers, middle hyphen (-) and underscore (_) are allowed. In this example we decided to put "John-Simith" and fortunately it is not repeated. Press the “Save” button at the bottom of the page and a basic customization to our account will be completed.
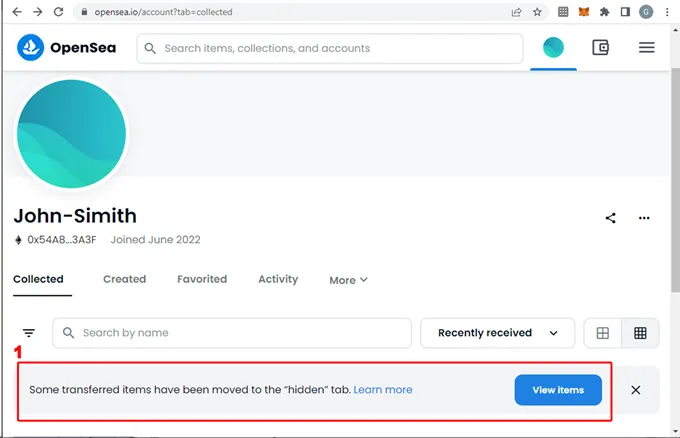
While configuring our profile, we rechecked the main screen and found the following:
(1) A warning from OpenSea is displayed indicating that some “items” have been transferred to our account but have been moved to a hidden folder. However, it invites us to open that folder to see the transferred items. An “item” is the equivalent of 1 NFT in our account. For example, if our account has 3 items, it means that we own 3 NFTs.
If this happens to you, YOU MUST TAKE SPECIAL CARE. OpenSea allows anyone to transfer an NFT to your account without your authorization, just as you receive an e-mail in your mailbox, for example. If the email is identified as suspicious and/or undesirable, it will arrive in your spam folder. In this case OpenSea does the same, when you receive an NFT of dubious origin without your authorization, the platform moves it to a tab called “hiddem items”. In general, these cases happen when it comes to NFTs of replicated collections and/or imitations in order to make you "let's take the bait" and make you interested in the collection to which it belongs.
But… why does OpenSea allow an NFT to be transferred from one account to another account without the recipient's authorization? When an authentic collection is released, as a promotional release, the creators of that collection usually do what is called an “airdrop”, that is, they promote their collection by giving away NFTs to OpenSea user accounts, transferring those NFTs randomly. This serves as a promotion to generate interest and movement of the collection in the blockchain.
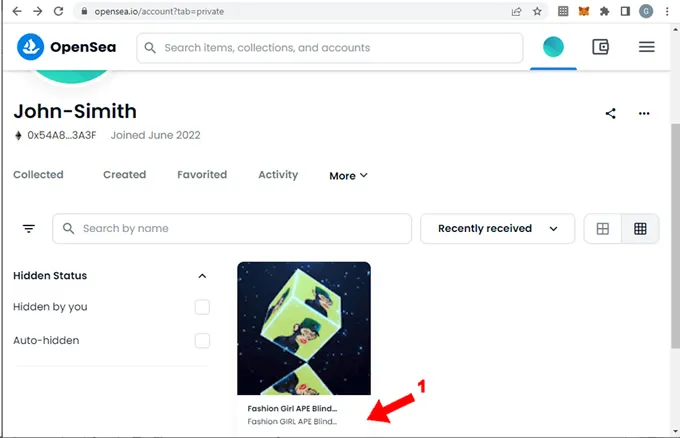
Out of curiosity we press the "View Items" button to see what they have given us:
(1) At first glance it looks like an imitation of the “Bored Ape Jatch Club” collection, make sure you have read the point above “Security measures to buy an NFT”
We will continue with the purpose of this tutorial, we suggest to ignore this type of NFTs that you could receive without your authorization, but if you think you have been lucky enough to have been randomly chosen for the gift of an NFT from an authentic collection and with a project real behind, you will need to do your own research.
The purpose of this point is to show you step by step how to buy an NFT in the OpenSea marketplace created on the Ethereum network. We have applied our own criteria to choose the NFT that we will buy in this example. This is an NFT belonging to one of the artists who sponsor the site.
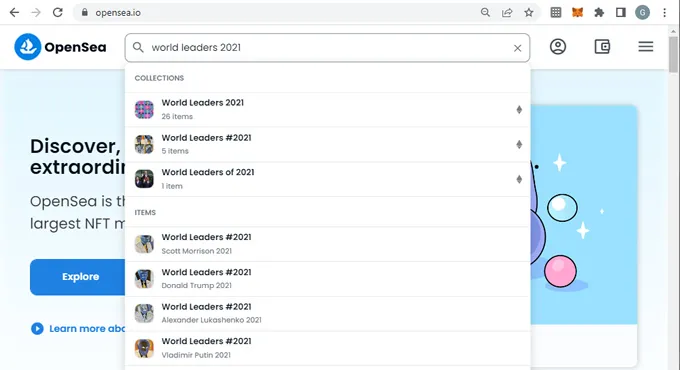
We will buy the lower value NFT on the “World Leaders 2021” collection by artist Saso Romano. To do this we will follow the following steps:
1. On the search box type the name of the collection of your interest to list all the NFTs associated with it, once it appears in the results we click on it, if at first glance you are not sure that it is what you are looking for you can enter one by one until you confirm that you have identified the correct one
2. Once inside the collection, as a good practice you can check the icons that are on the right side of the collection name, just below the presentation banner, in this case you can see the icon of a website associated with the collection (1) . In other collections you could find icons of Twitter, Instagram, Discrod, Telegram, etc. All this information added to the price is important to consider when making the decision to buy an NFT that belongs to the collection.
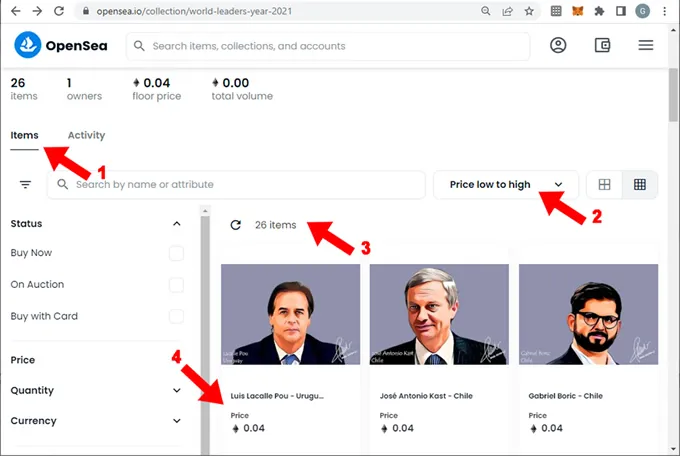
3. If you scroll down a bit you need to check that the “Items” tab is selected (1) and for this example we will sort the collection from lowest to highest price (2). We read that the collection has a total of 26 NFTs (3). It is interesting to navigate through each of these items, for the purposes of this tutorial we will choose the first of all, one of the cheapest (4) and click on it
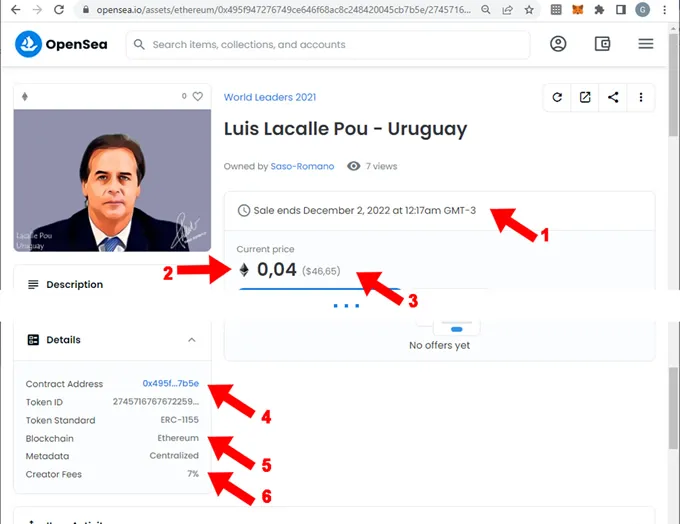
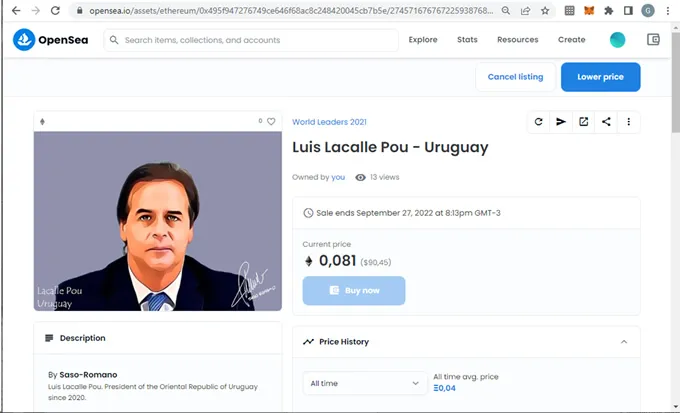
4. Once in the detail of the asset, we recommend taking a look at some relevant information:
5. Once you carefully verify all the characteristics of the asset, click on the “Buy now” button. If this button is not displayed, it means that the NFT is not for sale. In that case or if you would like to make a purchase offer of lesser value, you can press the “Make Offer” button, make an offer and enter the amount you are willing to pay for this NFT. All offers are made with a WETH balance in the Polygon network of your wallet, WETH is a wrapped ETH token, we have already delved into this in the article “Concepts you need to know before buying an NFT”
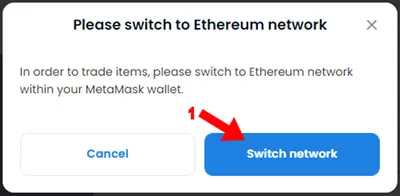
6. In this case we are buying an NFT created on the Ethereum network and in our wallet we had the Polygon network selected. Therefore, it requests that we change to the Ethereum network of our wallet to be able to dispose of the funds from said network. Click on “Switch network”
7. It throw a warning, select “Change network” (1)
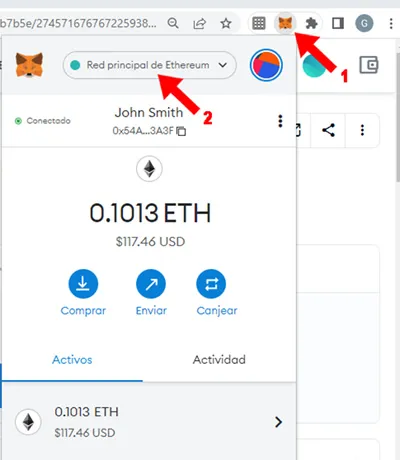
8. When checking our wallet from the browser by clicking on the extensions bar on the Metamask icon (1) it opens the wallet and we notice that the Ethereum network is now selected (2)
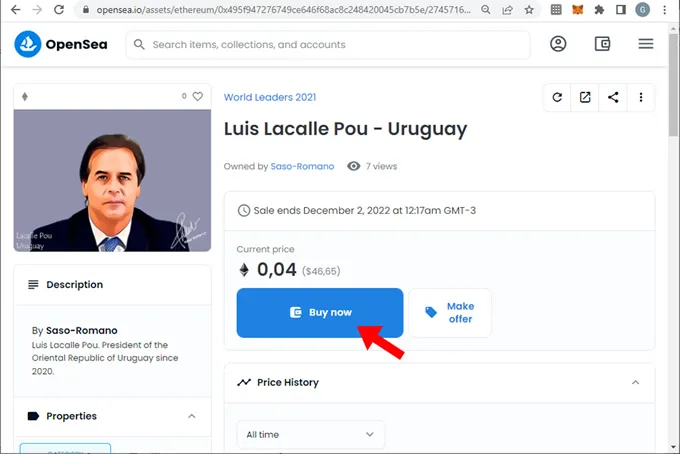
9. We repeat the purchase action by pressing “Buy Now” since this action had been suspended to give access and configure the wallet
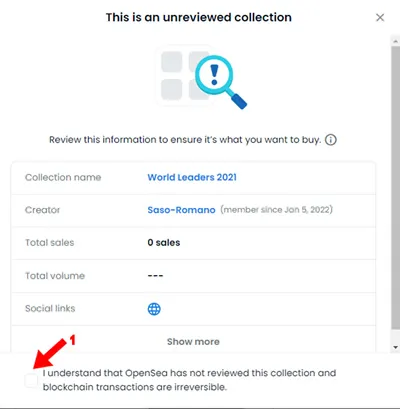
10. It throw a warning saying that OpenSea has not reviewed this collection and that you are responsible for having carried out all the necessary checks to avoid falling into a scam, this means that it is not a copy of an original collection or a imitation. We have already commented on this before and we have delved into the topic in the article “Is it advisable to buy an NFT from a collection that is not verified by OpenSea?”. OpenSea has hundreds of thousands of NFTs and collections of NFTs created on their platform and it stands to reason that they haven't verified all of their posts, so it's important to do your own research. In any case, buying an NFT from a collection verified by OpenSea undoubtedly offers an important security plus, but in general they are very high value NFTs. If you agree, click on “I understand…” (1)
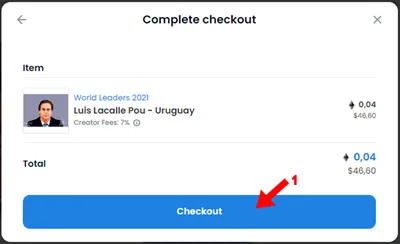
11. Verify the data and the price you will pay expressed in ETH with its conversion to USD and click on “Checkout”
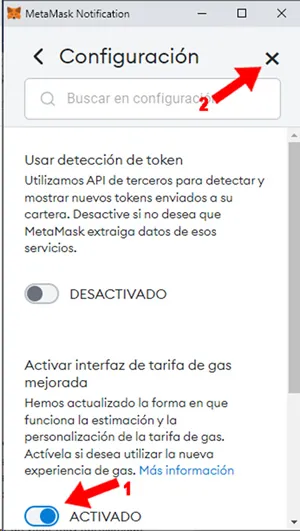
12. OpenSea automatically opens the wallet integrated into the browser so that from there you can review all the data associated with the transaction and finally invites you to "sign" to give the OK. If you are operating for the first time with your Metamask wallet, as in this case, it will surely request "Activate improved gas rate interface in the configuration" (1). The "Gas Fee" that we mentioned at the beginning of the article is the amount that the miners charge us for writing the transaction in the blockchain. This "Gas Fee" is known at the time of writing the transaction, not before, however there is a predictive algorithm that can give a very approximate value of the "Gas Fee" that we would pay for the transaction. That is what this point refers to, they have improved the prediction of this "Gas Fee" and of course we click on activate said interface (1) in the configuration
13. Open the wallet configuration screen, then click on the switch to activate this enhanced interface (1) . Once “ACTIVATED” is displayed, close the wallet configuration screen by clicking on the “X” at the top right (2)
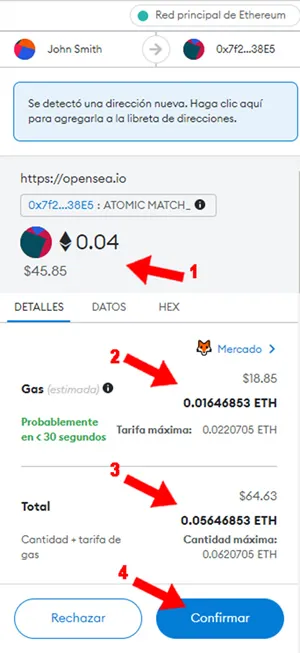
14. On the wallet informs the amount of the NFT (1), the approximate "Gas Fee" to pay (2), the total to pay (3) requests to confirm the operation definitively (4). Click on confirm and if you have enough funds in the wallet to cover the price of the NFT + "Gas Fee" the transaction will surely be successful.
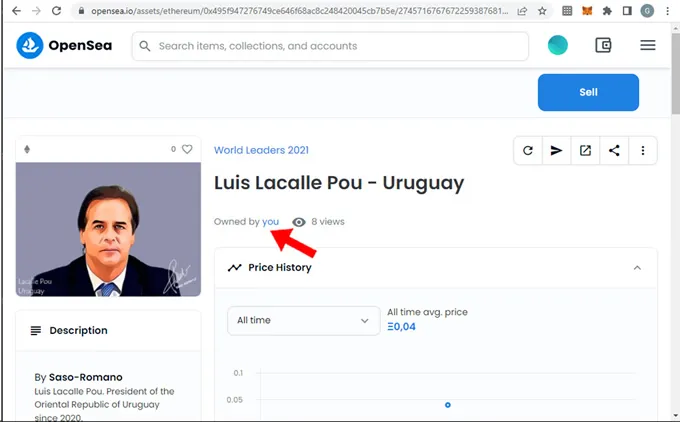
15. The page of the NFT that we bought is loaded and we can see that we already appear as the owners of it: “Owned by you” (1). The platform could take a few minutes to recognize the transaction, so if you are not listed as the owner, you can refresh the page. It also invites to put it up for sale. We will show you how to do it later.
NOTE: We have paid much less than what we had originally calculated for the "Gas Fee" when we transferred the money from our exchange to our wallet, for which we have available a credit balance in ETH.
We will put up for sale the NFT that we just bought with the intention of making a profit, you can also choose to have it for a long time without selling it in order for its value to appreciate, this modality is called “hold”, it depends on your horizon financial.
1. At the top right, when you rest the mouse on the circle of your account (1), a popup window opens, then click on “Profile” (2) . When loading the profile, several tabs are displayed just below the account identification, select the “Collected” tab (3) if it is not already selected. In addition to the warning message that we showed in the previous point, below are the items (an item is an NFT) that are owned by you. On the NFT that you have bought, press click (4) and the detail of the NFT will be loaded:
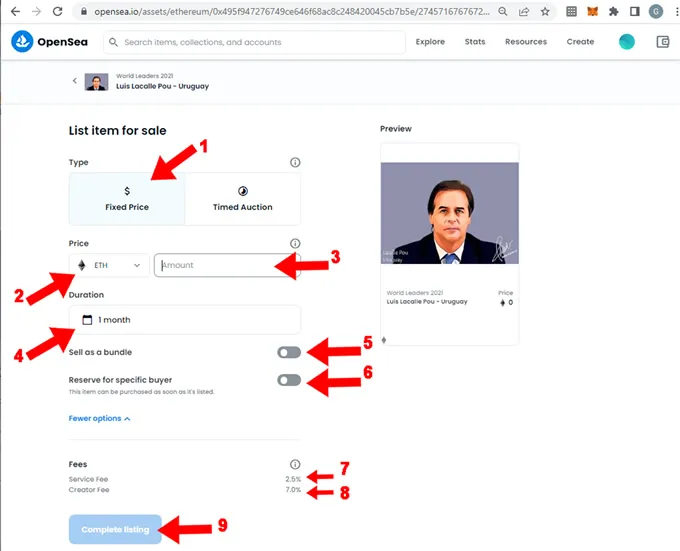
2. Press the button “Sell” (1) shown on the top right, then load the following page
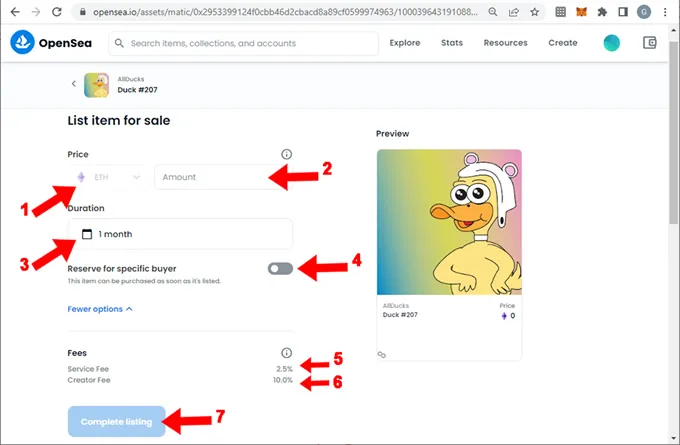
3. Now you need to complete each data that makes up the sale configuration:
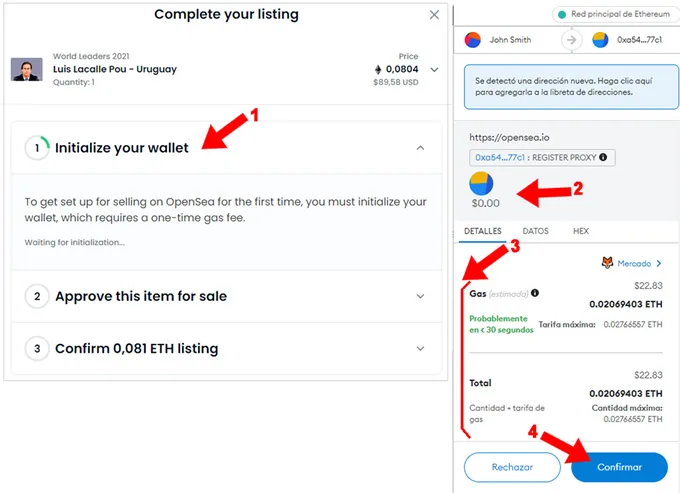
4. Here begins the sales process. OpenSea needs to initialize the wallet (1) only once, for this initialization step the platform must write a record in the Ethereum blockchain. As a consequence of this you need to pay a “Gas fee” to compensate the Ethereum miners for this transaction. As OpenSea warns, once this "Gas fee" has been paid to initialize the wallet, it will never ask us to carry out this step again, therefore you will not have to pay "Gas fee" again to put on sale any other NFT of your owned or this one. if its sale period ends and you will need to re-list it to sell. Because of this, it is important to always manage with a wallet, since if you register with a different wallet creating a new OpenSea account, you will have to pay this initialization before launching the first sale.
ALERT: this amount was not taken in the calculation of the sale price that we did previously for the example. Here you have two options: absorb this amount as it is one-time, or cancel the operation and add this value to the sale price. For practical reasons of this tutorial we will continue with the operation.
The platform opens the Metamask wallet integrated into the browser and shows that the cost of the initialization operation is zero (0.00) (2) and that the “Gas fee” to pay (3) is 0.02069403 ETH (22.83 USD). Press the "Confirm" button of the wallet (4)
NOTE: once you have pressed confirm, you may have to wait a few minutes while the wallet is initialized before continuing with the operation.
Once the wallet is initialized, the sale process continues as shown below:
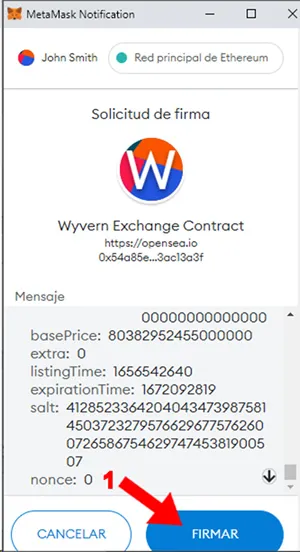
5. One-time wallet initialization completed and OpenSea approved the item (NFT) for sale. Now it asks to confirm the transaction in the wallet. For that you must read the message that shows about the wallet and go to the end (1) . Upon reaching the end of the message, it will enable the "sign" button so that the operation can be completed.
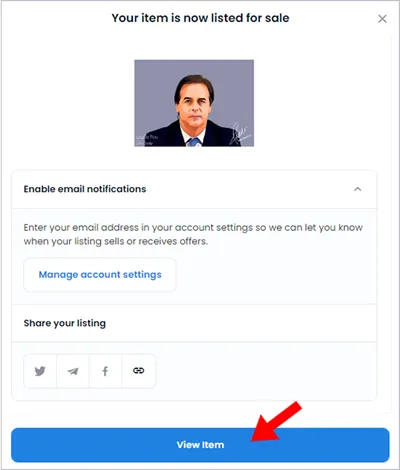
6. Press “Sign” (1) and the NFT should be listed for sale
7. Press “View Item”, then it shows the NFT for sale
8. In the event that someone buys this NFT, OpenSea will notify the purchase to the e-mail that you have indicated in your profile configuration. Although in this tutorial we only enter the username, it is recommended to enter an e-mail in the profile to be aware of this type of alert. OpenSea will immediately credit the approximate value of 0.0734 ETH in your wallet on the Ethereum network resulting from the sale price of 0.081 ETH discounting 2.5% commission and 7% royalties for the creator
We will show you step by step how to buy an NFT in the OpenSea marketplace created on the Polygon network. We will choose an NFT from the “AllDucks” collection that sponsors our site.
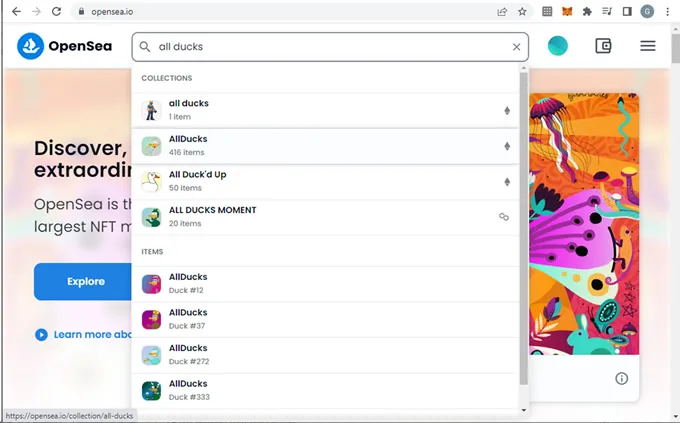
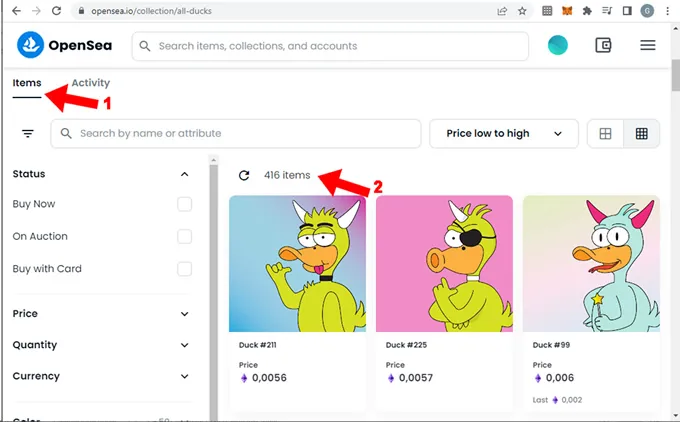
1. On the search box type the name of the collection of your interest to list all the NFTs associated with it, once it appears in the results we click on it, if at first glance you are not sure that it is what you are looking for you can enter one by one until you confirm that you have identified the correct one
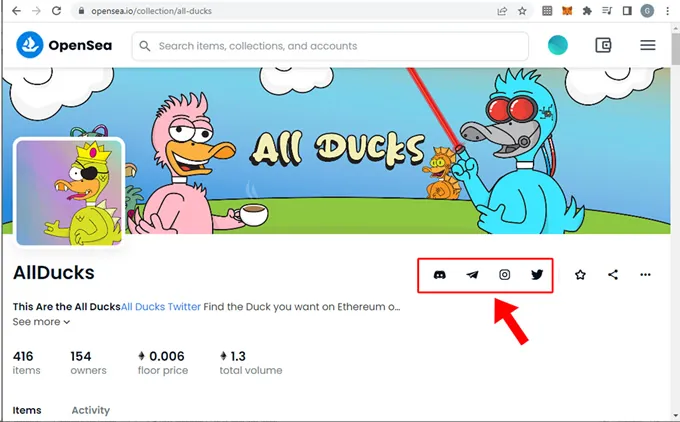
2. Once inside the collection, as a good practice you can check the icons that are on the right side of the collection name, just below the presentation banner, in this case you can see Discord, Telegram, Instagram and Twitter icons associated with the collection . All this information added to the price is important to take into account when making the decision to buy an NFT that belongs to the collection.
3. If you scroll down a bit you need to check that the “Items” tab is selected (1) and for this example we will sort the collection from lowest to highest price (2). We read that the collection has a total of 416 NFTs (2). It is interesting to navigate through each of these items, for the purposes of this tutorial we will choose one of them to buy.
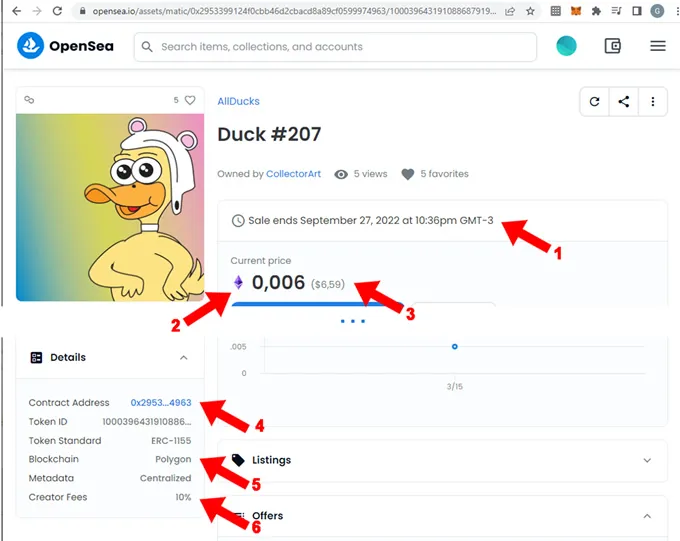
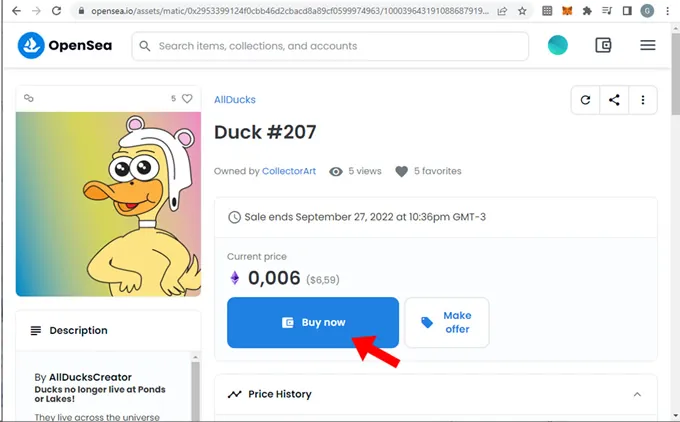
4. Once in the detail of the asset, we recommend taking a look at some relevant information:
Once you carefully verify all the characteristics of the asset before clicking on the "Buy now" button, you need to verify that your wallet is properly set up to work with the Polygon network. If you do not have the Polygon network selected, OpenSea will probably indicate other steps that we believe are inconvenient. These steps consist of making a deposit in Polygon with the ETH balance of the Ethereum network. In this tutorial we will avoid that path, we will choose another method that seems clearer to us, because of this it is essential to verify your wallet before buying an NFT created on Polygon.
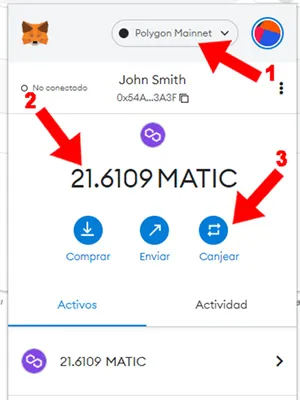
5. Verify in your wallet that the Polygon network (1) is selected. We currently have a balance in MATIC (2) (we had to make another transfer operation for 10 MATIC because we had calculated an insufficient budget to buy this NFT). Press “Redeem” (3), this will load another screen of the wallet
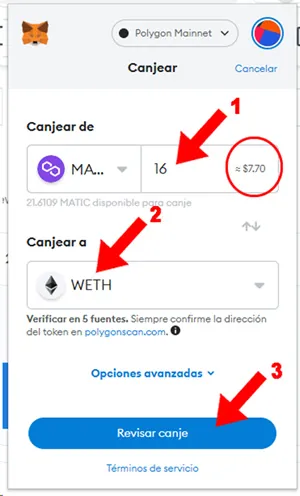
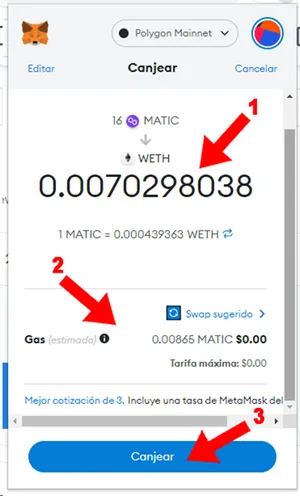
6. We redeem 16 MATIC (1) for an approximate value of 7.70 USD enough to pay the NFT that we select, and where it says “Redeem to” we select WETH. Press the "Review Exchange" button (3)
7. It shows the preview of the exchange with its value converted to WETH (1), the price of the "Gas Fee" (2) which is 0, sometimes it is usually 0.01 (insignificant cents on the dollar), verify this information and finally press "Redeem " (3)
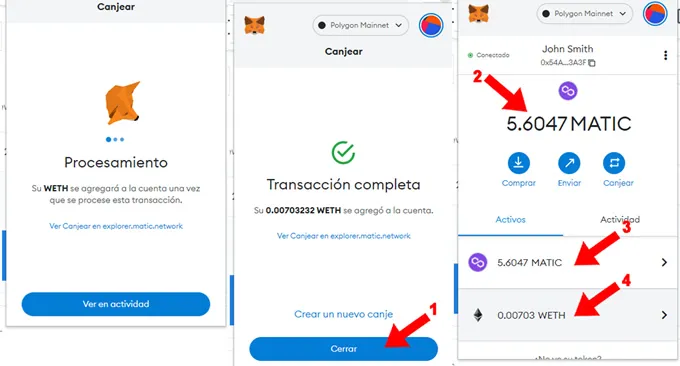
8. It will take a few seconds for the transaction to process, then it will display a transaction complete message. Press "Close" (1) and it will load the main screen of the wallet where the balance in MATIC is shown with the amount redeemed discounted (2) and (3) and added a new row indicating the balance in WETH (4) that we will need to buy the NFT
9. Go back to the NFT page to buy and press “Buy now”. If this button is not displayed, it means that the NFT is not for sale. In that case or if you would like to make a purchase offer of lesser value, you can press the “Make Offer” button, make an offer and enter the amount you are willing to pay for this NFT. Whether to buy or to bid on an NFT created on the Polygon network, you need your wallet to have a WETH balance.
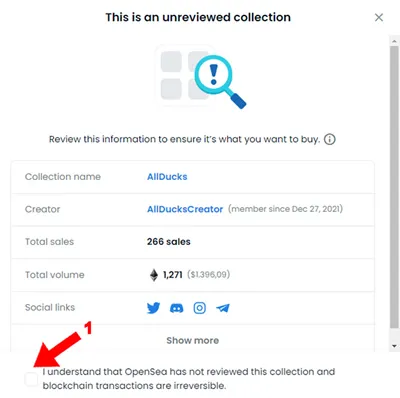
10. It throw a warning saying that OpenSea has not reviewed this collection and that you are responsible for having carried out all the necessary checks to avoid falling into a scam, this means that it is not a copy of an original collection or a imitation. We have already commented on this before and we have delved into the topic in the article “Is it advisable to buy an NFT from a collection that is not verified by OpenSea?”. OpenSea has hundreds of thousands of NFTs and collections of NFTs created on their platform and it stands to reason that they haven't verified all of their posts, so it's important to do your own research. In any case, buying an NFT from a collection verified by OpenSea undoubtedly offers an important security plus, but in general they are very high value NFTs. If you agree, click on “I understand…” (1)
11. Verify the data and the price you will pay expressed in WETH with its conversion to USD and click on “Checkout”
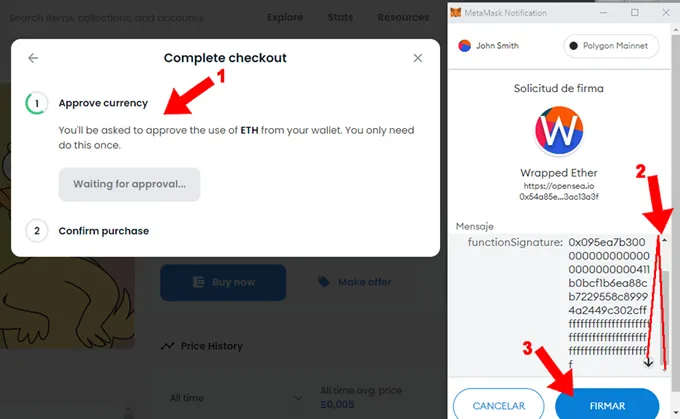
12. If it is the first time that you make an operation with WETH, it will ask you to confirm the use of WETH from your wallet once (1). On the next NFT purchase you will skip this step. On the screen of your wallet read all the text until the end (2), then it will enable the "Sign" button (3) that you must press
13. Now it asks to confirm the purchase of the NFT (1) . On the screen of your wallet read all the text until the end (2), then it will enable the "Sign" button (3) that you must press
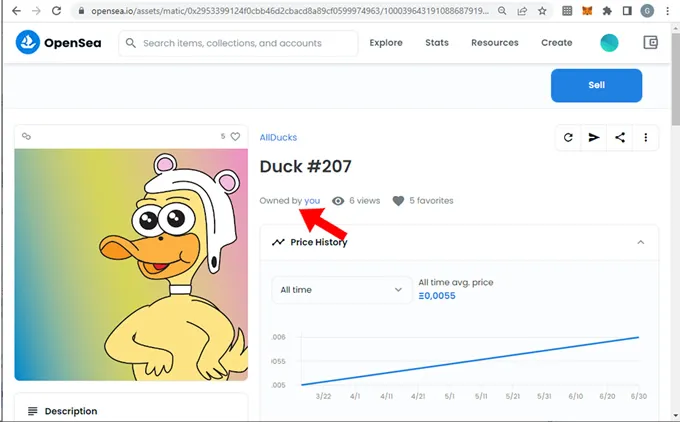
14. It shows the purchase made successfully and loads the page of the NFT that we bought, then it can be seen that we already appear as the owners of it: “Owned by you” (1). It may take a few minutes to acknowledge the transaction so if you are not listed as the owner you can refresh the page. It also invites to put it up for sale. We will show you how to do it later.
IMPORTANT: at no time did the process request to pay "Gas Fee", that is the biggest advantage of buying NFTs created on the Polygon network.
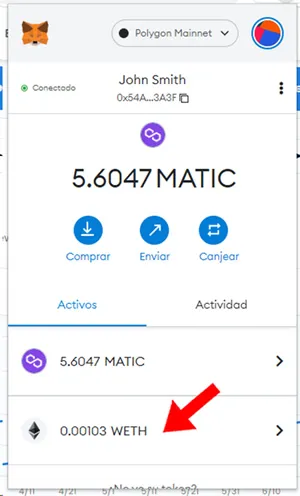
15. When verifying the WETH balance of our wallet and effectively only the amount of the NFT has been discounted without additional charges such as the "Gas Fee" that has high costs when buying on the Ethereum network
We will put up for sale the NFT that we just bought with the intention of making a profit, you can also choose to have it for a long time without selling it in order for its value to appreciate, this modality is called “hold”, it depends on your horizon financial.
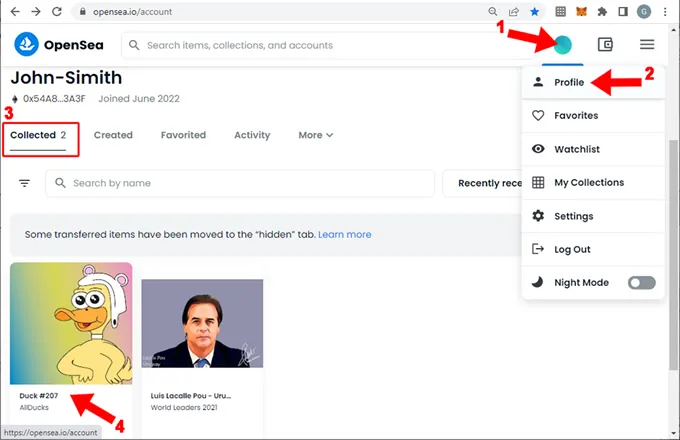
1. At the top right, when you rest the mouse on the circle of your account (1), a popup window opens, then click on “Profile” (2) . When loading the profile, several tabs are displayed just below the account identification, select the “Collected” tab (3) if it is not already selected. In addition to the warning message that we showed in the previous point, below are the items (an item is an NFT) that are owned by you. On the NFT that you have bought, press click (4) and the detail of the NFT will be loaded:
2. Press the button “Sell” (1) shown on the top right, then load the following page
3. Now you need to complete each data that makes up the sale configuration:
ALERT: if it is the first time that you operate with this wallet in OpenSea, the process will request to initialize your wallet as shown in point (4) of the previous section “We put the NFT purchased on the Ethereum network for sale”. But since we already initialized it when we put the NFT purchased on the Ethereum network for sale, then it does not request this step
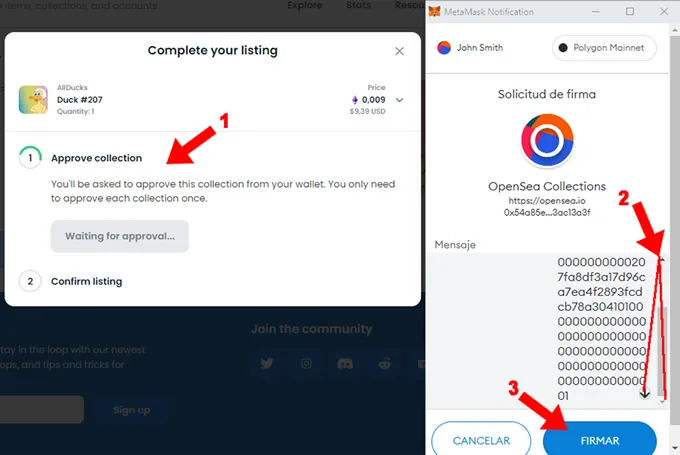
After pressing “Complete listing” it asks:
4. Request to approve the collection of NFT one time (1). Regarding the wallet, it requests approval, if you put another item from this collection on sale, it will no longer request this step. You should read the message it shows in the wallet and go to the end (2) . When you reach the end of the message, it will enable the "Sign" button (3) so that the operation can be completed, you need to press it.
5. Request to confirm the sale (1). Again on the wallet request approval but this time of the sale you are making, you must read the message that appears in the wallet and go to the end (2) . When you reach the end of the message, it will enable the "Sign" button (3) so that the operation can be completed, you need to press it.
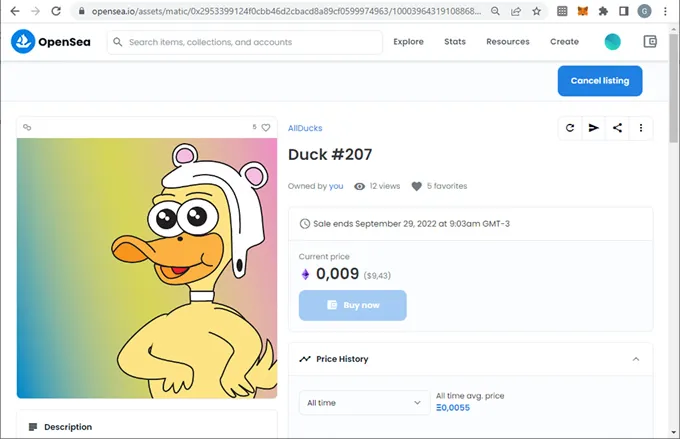
6. Press “View listing”, then it shows the NFT for sale
7. In the event that someone buys this NFT, OpenSea will notify the purchase to the e-mail that you have indicated in your profile configuration. Although in this tutorial we only enter the username, it is recommended to enter an e-mail in the profile to be aware of this type of alert. OpenSea will immediately credit the approximate value of 0.007875 WETH to your wallet on the Polygon network resulting from the sale price of 0.009 ETH discounting 2.5% commission and 10% royalties for the creator
NFT Trends