


October 2023
 Loading...
In this article we will describe step by step how to transfer funds from your exchange account to your Metamask wallet to buy NFT. We will use the web platform of the Binance exchange, but the tutorial can also be applied to any other exchange since the concepts and procedures are the same, only the views and the location of the options change that you will have to look for patiently in case you do not have the platform we use in the example.
First you need to check the availability of funds from your centralized wallet within the exchange. For our example we follow these steps:
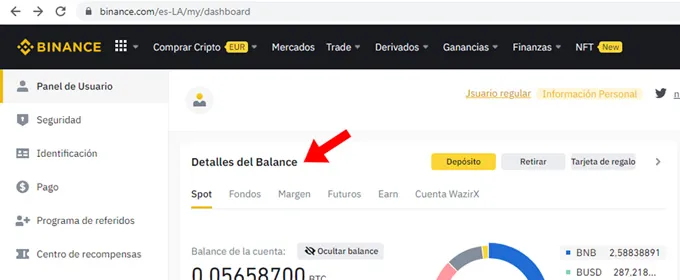
1. Once inside your exchange account select "Balance Details" from the main dashboard
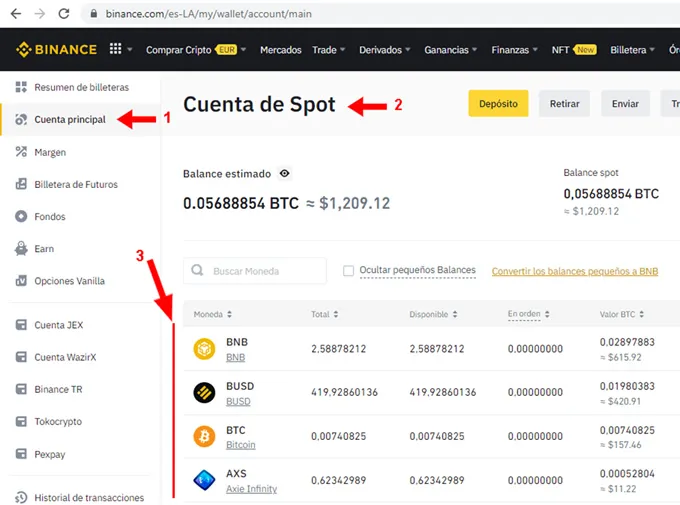
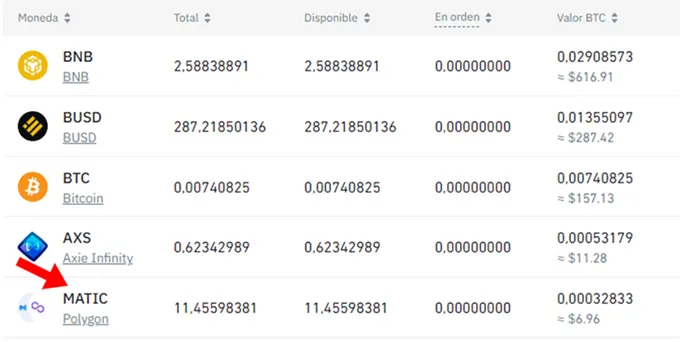
2. Select “Main account” (1) and verify that you are positioned in the balance of the Spot wallet (2). Once this is done, go to the detail of the cryptocurrencies that you have in the balance (3) and verify the available balance in ETH and/or MATIC.
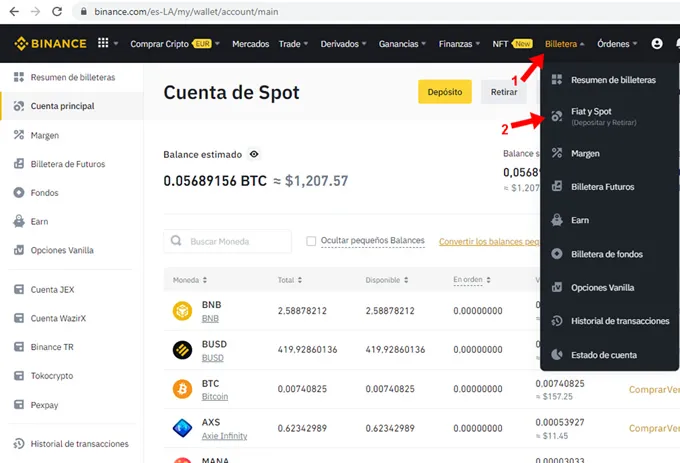
Another way to access your Spot wallet (2) is as follows:
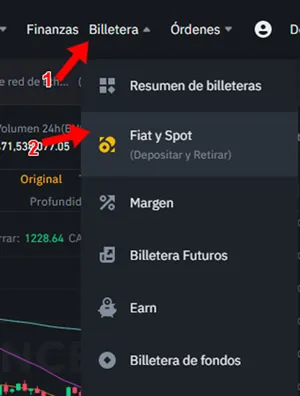
3. Select from the upper horizontal menu "Wallet" (1) and from the menu that is displayed select "Fiat and Spot" (2)
Our goal is to buy one NFT that costs the equivalent of USD 50 in ETH created on the Ethereum network and another NFT that costs the equivalent of USD 7 in ETH created on the Polygon network, therefore you will need the following balance:
According to the example balance there is no available balance in ETH, therefore we will buy 127 USD in ETH on the Binance cryptocurrency market using the stablecoin BUSD. But if you want you can use any other stablecoin or cryptocurrency to buy ETH.
Another way to do this is by choosing the option to convert the indicated amount from one cryptocurrency to another cryptocurrency.
In this example, the combination of both forms will be used, first 127 USD of ETH will be bought in the Spot market and then 7 BUSD will be converted into MATIC in the conversion section. These operations are necessary since ETH is needed to transfer to the “Ethereum Network” of the Metamask wallet and MATIC to transfer to the “Polygon Network” of the same wallet.
To buy ETH you need to perform the following steps, if you already have enough funds in ETH you can skip to the next step -click here-
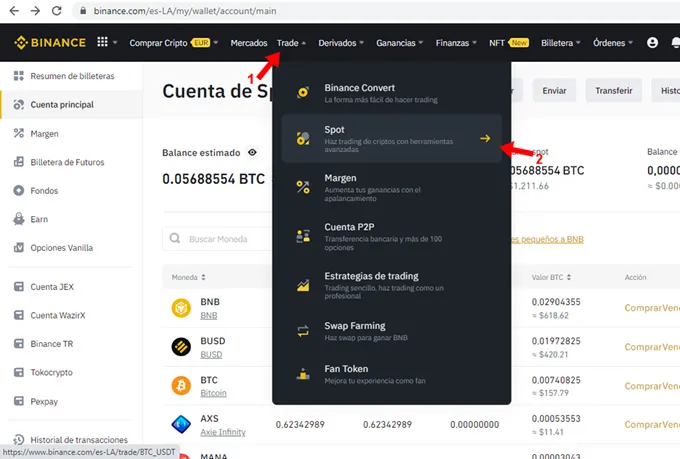
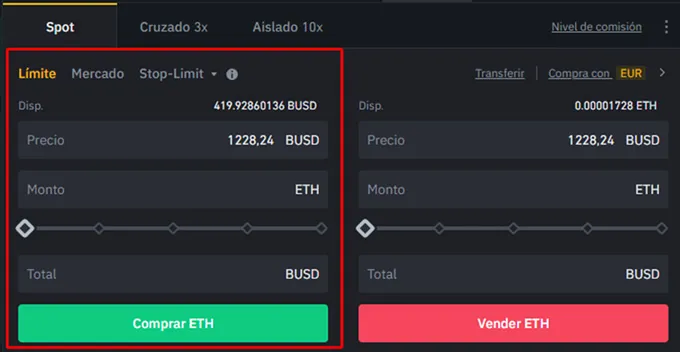
1. Select from the horizontal menu “Trade” (1) and from the menu that appears select “Spot”. It will then display a page like to the following:
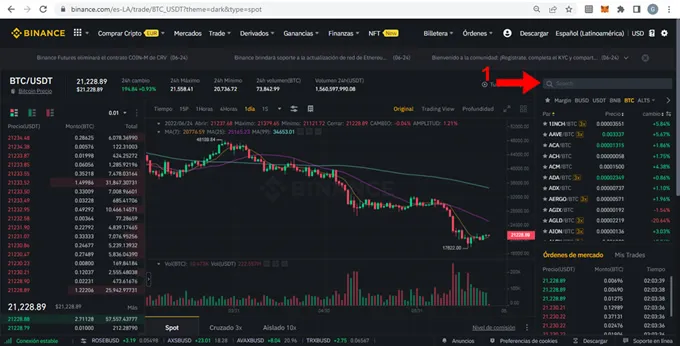
2. Go to the box on the top right (1) to find the cryptocurrency you need to buy, in this case ETH
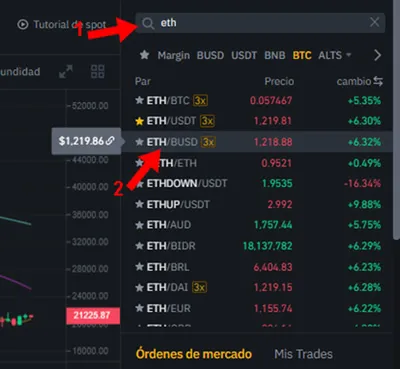
3. Type ETH into the search box (1) and the dropdown window will filter all options. For this case, select the ETH/BUSD pair (2). Then it will show the following screen:
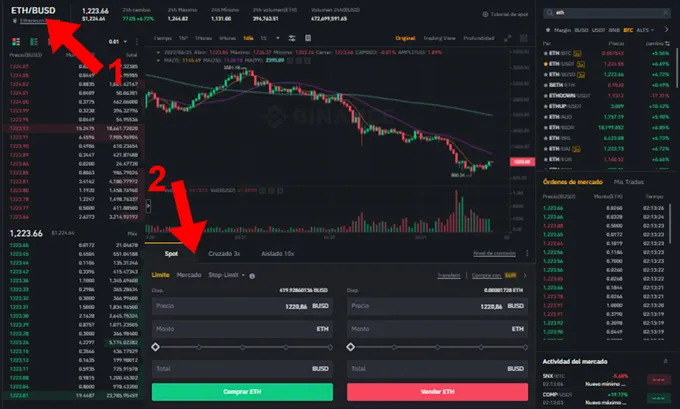
4. Verify at the top left that the selected pair is correct (1) and then go down to where the Spot tab is (2)
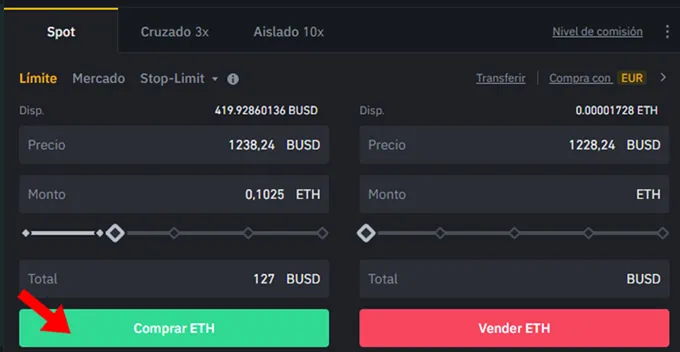
5. Complete the necessary information in the purchase column indicated with the red box identified in the screenshot. For this example, enter 127 USD where it says “Total” and it will automatically calculate the ETH that we will buy according to the pre-established limit price above. To achieve a quick execution of the buy order it may be convenient to add a few dollars to the limit price due to the volatility of the price, for this example we will increase 10 USD. Another option is to buy at market price, that will execute the order immediately at the price at the time of confirmation and calculate the corresponding ETH in that process.
6. Press buy and the trade should have been executed successfully if we have the funds available.
7. Return to the Spot wallet
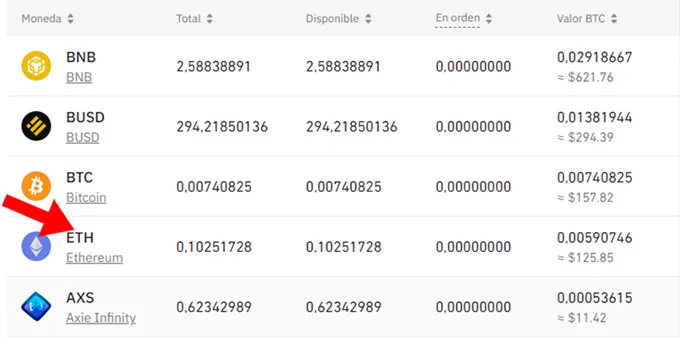
8. We already see the funds available in ETH
We will describe a step by step to send ETH to our Metamask wallet from our wallet in the centralized exchange Binance, although the same concepts can be applied from the exchange of your choice:
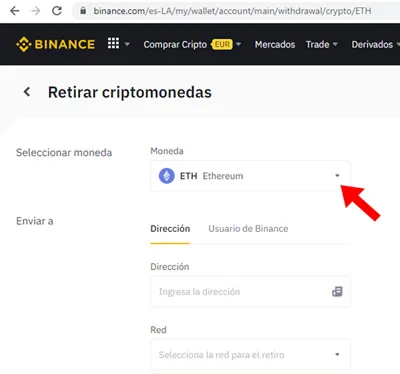
1. On the Spot account look for the “Withdraw” option and select it
2. On the “Select currency” combo choose ETH Ethereum
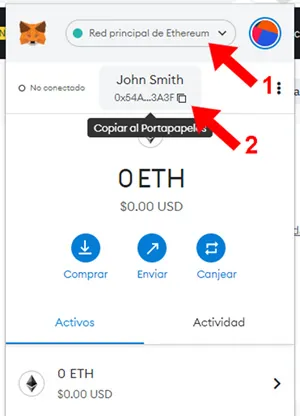
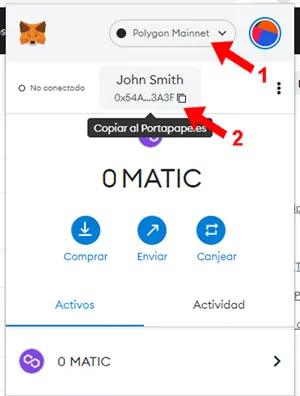
3. On your Metamask wallet, make sure you have selected the “Ethereum Network” (1) and then click on the icon to copy the address of our wallet (2), this action will load it in the computer buffer to later be able to paste it in our exchange or if you want to be able to send it through some messaging system in case you are operating the exchange on another computer
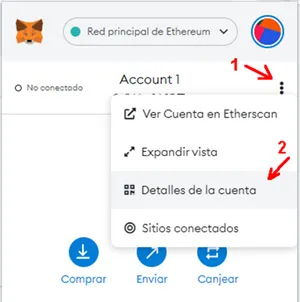
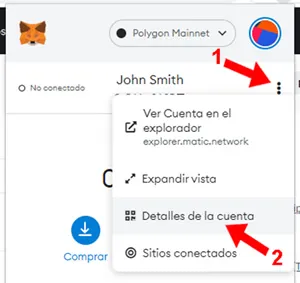
NOTE: another way to get the address of our wallet is by pressing the 3 dots on the top right as shown below:
3-a. Select the 3 dots on the top right (1) and then account details from the dropdown menu (2) . The following will be displayed:
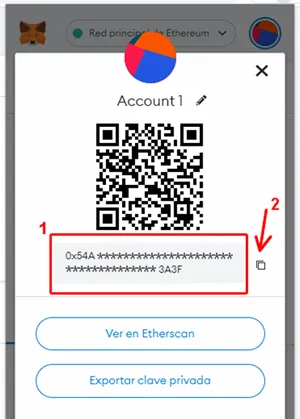
3-b. The address that identifies the wallet (1) is displayed and since in the first case it is possible to click on the icon to copy the address of the wallet (2), this action will load it in the computer buffer
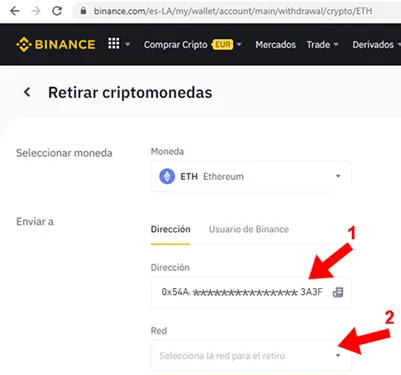
Return to the exchange and continue with the operation:
4. In the “Send to” section where it says “Address” (1) paste the address obtained from the wallet and select just below where it says “Network” (2), then the following screen will be displayed:
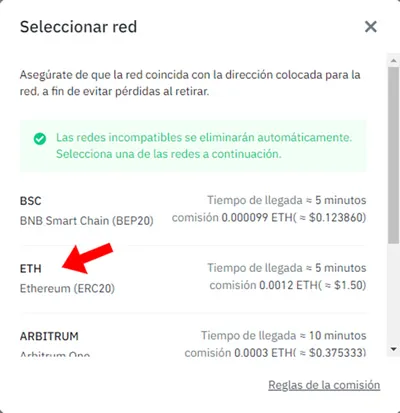
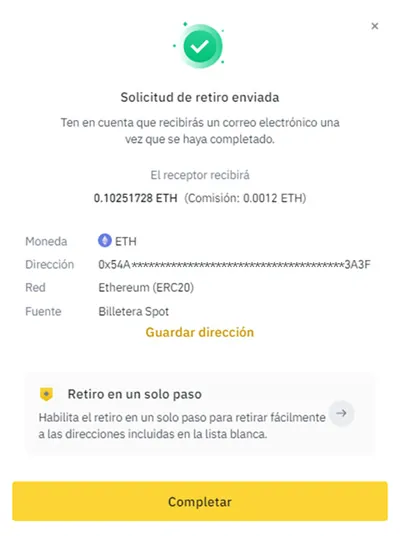
5. Select the network “ETH – Ethereum (ERC20)”. It is very important to select the correct network as indicated, otherwise it could cause the loss of the funds that are trying to be sent to the wallet. Once this is done, the following information is displayed:
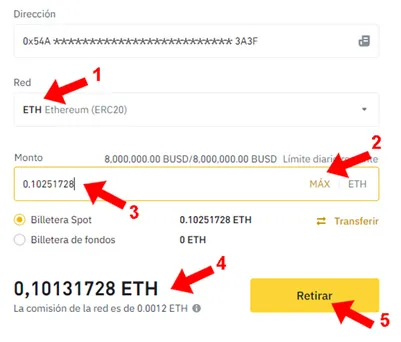
6. Verify the correct selection of “ETH – Ethereum (ERC20)” (1) , in “Amount” request the amount in ETH, not in dollars, in this example you need to send the total ETH balance to the wallet, then directly press the “MAX” button (2), in case you need to transfer a partial amount and not the total balance in ETH you need to type the value in ETH (3). If you know the amount in dollars you need to do the conversion manually, for example, in this case you need to send 127 USD, the current value of ETH is approximately 1,250 USD, therefore apply the following division: 127 / 1250 = 0.1016 . In this example, pressing "MAX" (2) will autocomplete a similar value that corresponds to the total of the balance in ETH. If instead you know exactly the amount of ETH you need to send, it is easier and you will type it directly without doing the calculations. At the bottom left of the “Withdraw” button, the commission that will be deducted from the amount sent is shown, in this case 0.0012 ETH (4), whose calculation in dollars would be 0.0012 * 1,250 = 1.5 USD in this example. Finally press the “Withdraw” button, this will start a withdrawal process that can take a few minutes.
ALERT: In the case of being the first time you make a withdrawal, the platform could ask some security questions, in this case Binance. In the article Binance, verification questionary before making withdrawals we show an example of the completed questionary along with the appropriate answers.
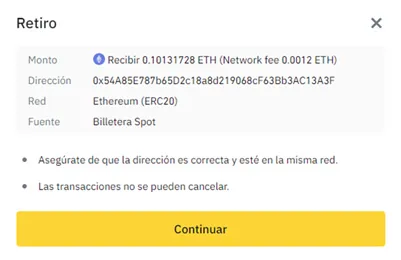
Once the withdrawal is confirmed, it will show the following confirmation screen to continue sending our funds to the Metamask wallet:
7. Verify that the information is right and press "Continue". Then it shows the following screen:
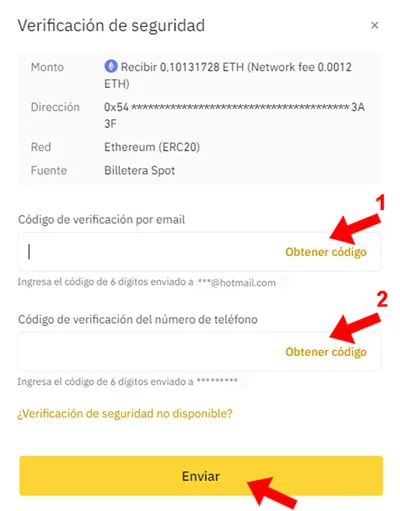
8. This screen needs to verify that you are the owner of the account and for this it requests a double validation of data by sending a verification code to your e-mail account and another verification code by SMS to your cell phone. Depending on the exchange, this verification could vary. In this case you have to make sure you have our e-mail account open and your cell phone at hand. Then press “Get code” (1) in the box to verify the e-mail address, wait for the e-mail with the verification code to arrive and transcribe it. Then press “Get code” (2) in the box to verify the phone number, wait for the SMS with the verification code to arrive and transcribe it. Finally, press "Send" and the process of withdrawing/sending funds to your Metamask wallet will start if the information you have entered was correct.
9. It shows the withdrawal request as “sent” so you must press the “Complete” button
10. Only occasionally it might show a warning like this saying that the withdrawal request can take about 12 hours. Many times, despite this warning, the request is usually completed in a few minutes
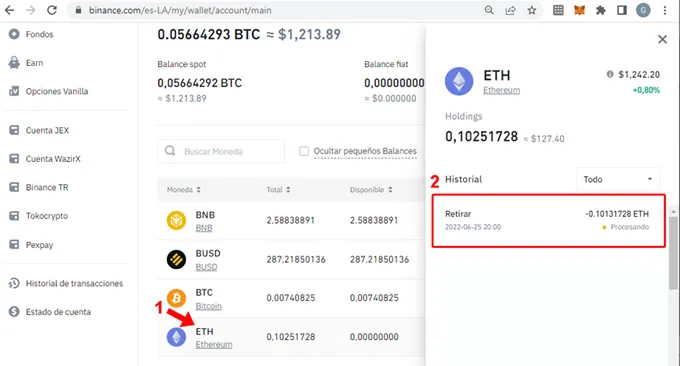
11. Go back to your Spot exchange wallet and click on the ETH balance (1), it will open a window with the balance in ETH and at the bottom it will show the history of operations (2) where you can see the operation that we have entered in status “ Processing”, that is why the funds have not yet been deducted
ALERT: the withdrawal process from the exchange to the wallet could take from a few minutes to several hours, depending on the congestion of the ERC20 network. Therefore, it is possible that the funds are reflected in our Metamask wallet in a few moments or that it may take several hours until they arrive correctly.
In this case, the withdrawal process was completed in less than 5 minutes:
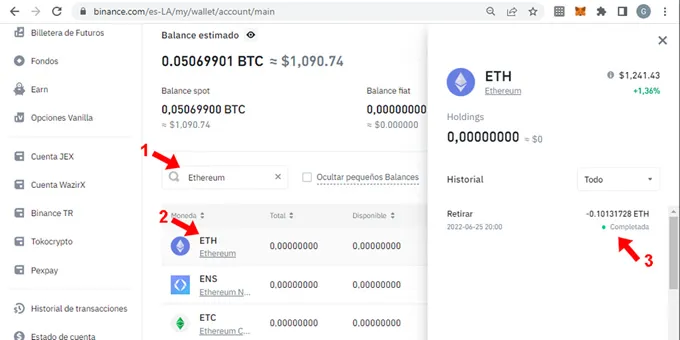
12. Reload the Spot wallet page, if the withdrawal process has been completed, ETH will probably no longer appear in the balance because, if the total has been withdrawn, it has been left at zero. Then enter the filter of the “Ethereum” wallet (1), it lists ETH, we click on ETH (2) and on the right it shows that the withdrawal (sending to the Metamask wallet) was completed correctly (3)
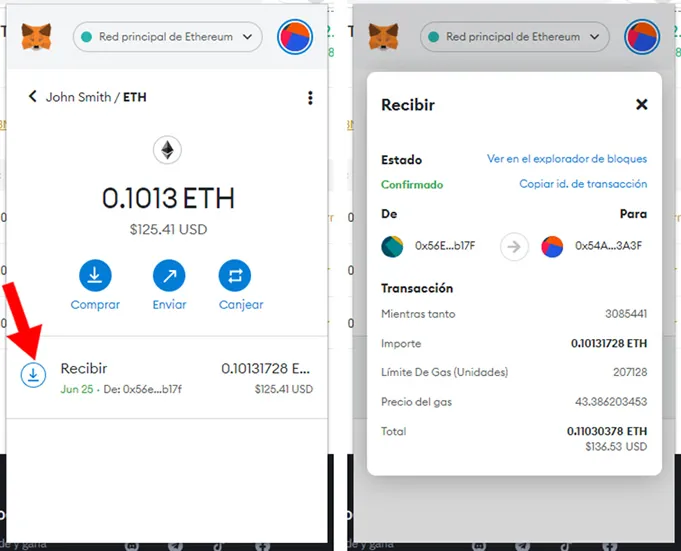
Now you need to check the ETH balance of the Metamask wallet
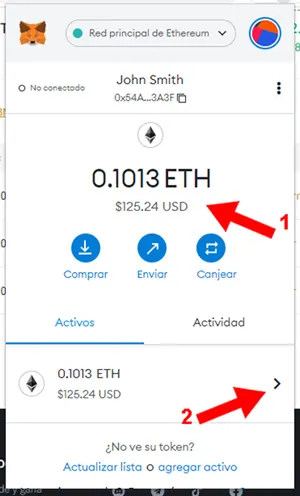
13. The funds have arrived successfully (1). It may happen that the exchange shows it as completed but only after a few minutes the balance of the operation is reflected in the wallet. This happens because transactions within the blockchain have a delay, especially if the network is congested at the time of carrying out this type of operation.
14. If you want to see the history of operations within the wallet we can press the arrow “>” where the ETH balance appears at the bottom (2)
15. Press the down arrow on the detail of the operation you want to view and another window will open where all the data is shown.
With this last step you have completed the transfer of ETH – Ethereum funds from the Binance exchange to your Metamask wallet.
Following our case you need to transfer the equivalent of 7 USD to the Polygon network of your wallet. To do this you can convert 7 BUSD to the MATIC cryptocurrency (you can also choose to buy MATIC on the trade market as shown with ETH)
To convert BUSD into MATIC you need to follow these steps, if you already have enough funds in MATIC you can skip to the next step -click here-
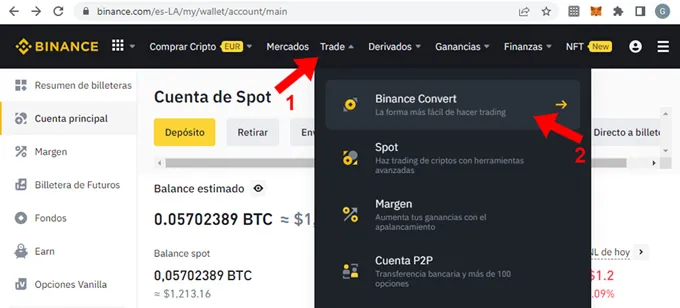
1. Select from the horizontal menu “Trade” (1) and from the menu that is displayed select “Binance Convert”. Then it will display a page similar to the following:
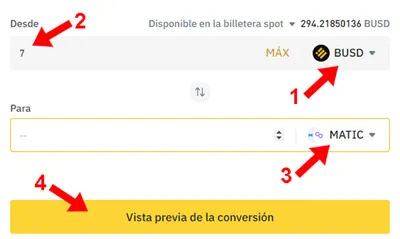
2. In "From" on the right select the currency BUSD (1). Enter the amount of BUSD to convert (2) and in “To” on the right select MATIC (3). Confirm by pressing "Conversion preview" (4)
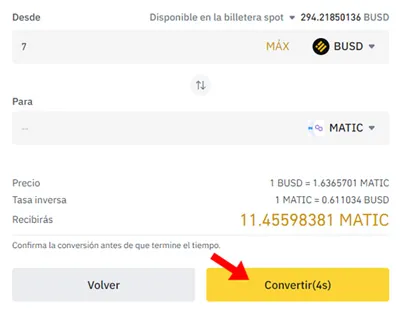
3. Check the information and press the “Convert” button
4. Almost immediately the funds are reflected in MATIC to transfer to your Metamask wallet
We will describe a step by step to send MATIC to our Metamask wallet from our wallet on the centralized exchange Binance, although the same concepts can be applied from the exchange of your choice.
Here the most important thing to note is that it changes the network you need to select to send the funds, unlike the previous operation when you have sent ETH. We remind you that the purpose of sending MATIC to your Metamask wallet is to be able to buy an NFT on the Polygon network.
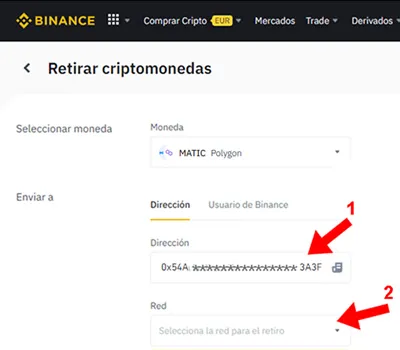
1. On the Spot account look for the “Withdraw” option and select it
2. On the “Select currency” combo choose MATIC
3. About the Metamask wallet you need to make sure you have selected “Poligon Mainnet” (1) and then click on the icon to copy the address of the wallet (2), this action will load it in the computer buffer to later be able to paste it in our exchange or if you want to be able to send it through some messaging system in case you are operating the exchange on another computer
NOTE: another alternative to get the wallet address is by pressing the 3 dots on the top right as shown below:
3-a. Select the 3 dots on the top right (1) and then account details from the dropdown menu (2) . It will show us the following:
3-b. The address that identifies the wallet (1) is displayed and since in the first case it is possible to click on the icon to copy the address of the wallet (2), this action will load it in the computer buffer
Return to the exchange and continue with the operation:
4. In the “Send to” section where it says “Address” (1) paste the address obtained from the wallet and select just below where it says “Network” (2), then the following screen will be displayed:
5. Select the network “MATIC – Polygon”. It is very important to select the correct network as indicated, otherwise it could cause the loss of the funds that are trying to be sent to the wallet. Once this is done, the following information is displayed:
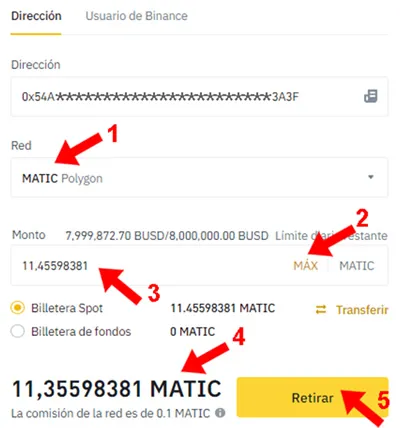
6. Verify the correct selection of "MATIC - Polygon" (1), in "Amount" request the amount in MATIC, not in dollars, in this example you need to send the total of the MATIC balance to the wallet, then directly press the "MAX ” (2), in case you need to transfer a partial amount and not the total balance in MATIC you need to type the value in MATIC (3). If you know the amount in dollars you need to do the conversion manually, for example, in this case you need to send 7 USD, the current value of MATIC is approximately 0.5873 USD, therefore we apply the following division: 7 / 0.5873 = 11.9189. In this example, pressing “MAX” (2) will autofill a similar value that corresponds to the total balance in MATIC. If instead you know exactly the amount of MATIC you need to send, it is easier and you will type it directly without doing the calculations. At the bottom left of the “Withdraw” button, the commission that will be deducted from the amount sent is shown, in this case 0.2 MATIC (4), whose calculation in dollars would be 0.1 * 11.9189 = 1.19 USD in this example. Finally press the “Withdraw” button, this will start a withdrawal process that can take a few minutes.
ALERT: In the case of being the first time you make a withdrawal, the platform could ask some security questions, in this case Binance. In the article Binance, verification questionary before making withdrawals we show an example of the completed questionary along with the appropriate answers.
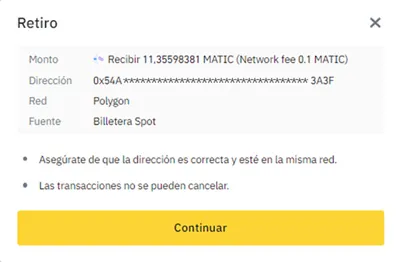
Once the withdrawal is confirmed, it will show the following confirmation screen to continue sending your funds to the Metamask wallet:
7. Verify that the information is right and press "Continue". Then it shows the following screen:
8. This screen needs to verify that you are the owner of the account and for this it requests a double validation of data by sending a verification code to your e-mail account and another verification code by SMS to your cell phone. Depending on the exchange, this verification could vary. In this case you have to make sure you have our e-mail account open and your cell phone at hand. Then press “Get code” (1) in the box to verify the e-mail address, wait for the e-mail with the verification code to arrive and transcribe it. Then press “Get code” (2) in the box to verify the phone number, wait for the SMS with the verification code to arrive and transcribe it. Finally, press "Send" and the process of withdrawing/sending funds to your Metamask wallet will start if the information you have entered was correct.
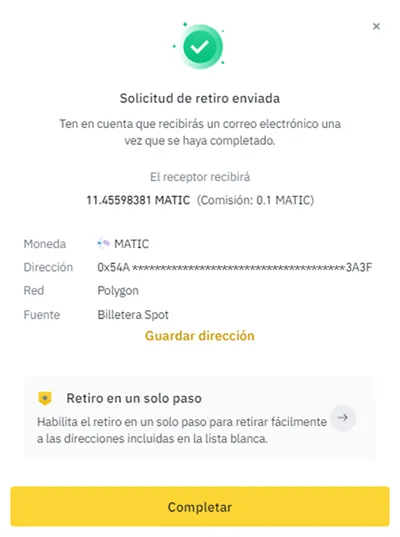
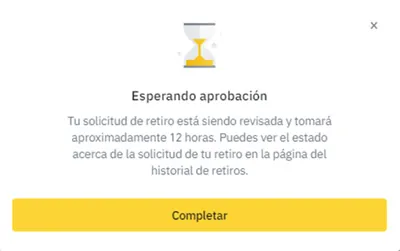
9. It shows the withdrawal request as “sent” so you must press the “Complete” button.
10. Only occasionally it might show a warning like this saying that the withdrawal request can take about 12 hours. Many times, despite this warning, the request is usually completed in a few minutes
11. Go back to your Spot exchange wallet and click on the MATIC balance (1), it will open a window with the balance in MATIC and at the bottom it will show the history of operations (2) where you can see the operation that we have entered in status “Processing”, that is why the funds have not yet been deducted
ALERT: the withdrawal process from the exchange to the wallet could take from a few minutes to several hours, depending on the congestion of the Polygon network. Therefore, it is possible that the funds are reflected in our Metamask wallet in a few moments or that it may take several hours until they arrive correctly.
In this case, the withdrawal process was completed in less than 10 minutes:
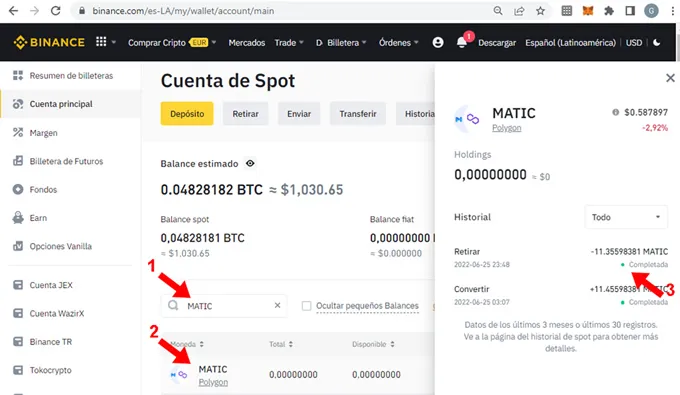
12. Reload the Spot wallet page, if the withdrawal process has been completed, MATIC will probably no longer appear in the balance because, if the total has been withdrawn, it has been left at zero. Then enter the filter of the “Ethereum” wallet (1), it lists ETH, we click on ETH (2) and on the right it shows that the withdrawal (sending to the Metamask wallet) was completed correctly (3)
Now you need to check the MATIC balance of the Metamask wallet:
ALERT: in this case, the exchange tells us that the operation was completed, as we mentioned, it took less than 10 minutes to complete the process of withdrawing/sending funds. However, in our Metamask wallet the operation has not yet been reflected. Transactions within the blockchain have a delay, especially if the network is congested at the time of carrying out this type of operation. So we'll wait...
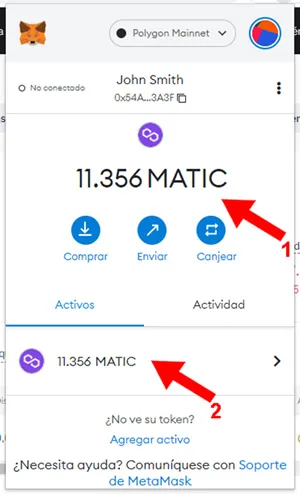
The funds have arrived! That took another 10 minutes and they were reflected in our Metamask wallet:
13. The funds have arrived correctly (1) and (2)
With this last step you have completed the transfer of MATIC – Polygon funds from the Binance exchange to your Metamask wallet
You already have the Metamask wallet ready to buy 1 NFT on the Ethereum network and 1 NFT on the Polygon network. We recommend going to the article "Step by step how to buy an NFT to invest" to advance to the next step.
NFT Trends